Install MIM Sync with PowerShell
A recent project involved installing Microsoft Identity Manager (MIM) 2016 SP1 as part of a deployment to Azure. As this is being done using DSC there was no way to interact with the installation or click buttons in a installation wizard, so PowerShell to the rescue. MIM is a pretty complicated application, it has a number of different components that need to be installed on various different hosts and some interesting requirements as part of that. For the first part of this installation I needed to install MIM’s Synchronization Service, which handles running the various management agents and communicating with other systems like AD, CRM etc. This has a few requirements that are well documented but most important are .net 3.5 and a SQL server.
Helpfully Microsoft provide a batch file with the information you need to provide to the installer to automate installing MIM Sync, available in the root of the MIM Sync directory next to the msi. Taking the bulk of this batch file and turning it into PowerShell was easy, populating the various variables with values generated as part of the DSC configuration to ensure it was always up to date. However this script assumes that SQL Server is installed on the local machine and doesn’t offer any parameters to pass to the msi to change this.
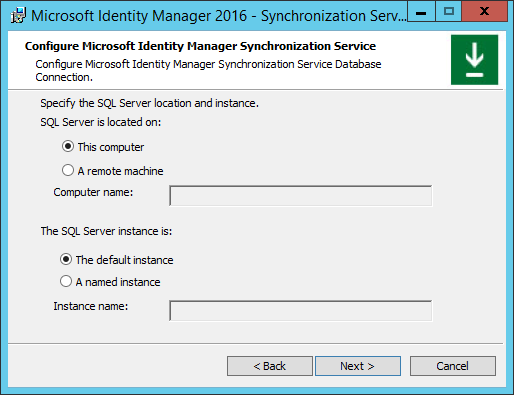
When manually installing MIM Sync there is a handy box for choosing which SQL server to use:

Running this installer with the /l*v flag to enable verbose logging and digging through the logs and Orca revealed a nice and simple set of parameters that are changed by the UI:
- STORESERVER - the name of the SQL server to use
- SQLServerStore - Toggles between RemoteMachine and LocalMachine
Unfortunately due to being an msi we can’t provide SQLServerStore parameter at the command line as it’s not in upper case, the solution was a simple MST file which sets SQLServerStore to RemoteMachine and adds a STORESERVER property with a value of 123 so we can provide it at the command line.
This results in a nice block of DSC config that looks like this, with the important bit being lines 17 and 18:
1
2
3
4
5
6
7
8
9
10
11
12
13
14
15
16
17
18
19
20
21
22
23
24
25
26
27
28
29
30
 #START Install MIM Sync Service
    $InstallArguments = @(
        "SERVICEACCOUNT=MIMSyncService"
        "SERVICEPASSWORD=$($Credential.GetNetworkCredential().Password)"
        "SERVICEDOMAIN=$DomainNetbiosName"
        "GROUPADMINS=$DomainNetbiosName\MIMSyncAdmins"
        "GROUPOPERATORS=$DomainNetbiosName\MIMSyncOperators"
        "GROUPACCOUNTJOINERS=$DomainNetbiosName\MIMSyncJoiners"
        "GROUPBROWSE=$DomainNetbiosName\MIMSyncBrowse"
        "GROUPPASSWORDSET=$DomainNetbiosName\MIMSyncPasswordReset"
        "ACCEPT_EULA=1"
        "FIREWALL_CONF=1"
        "ADDLOCAL=All"
        "SQMOPTINSETTING=1"
        "REBOOT=ReallySupress"
        "STORESERVER=$SqlNodeName"
        "TRANSFORM=C:\Packages\sync.mst"
        "/l*v C:\MIM\$(Get-Date -format 'yyyy-MM-dd-hh-mm').log"
    )
    Package MimSyncInstall {
        Name = 'Microsoft Identity Manager Synchronization Service'
        ProductId = '5A7CB0A3-7AA2-4F40-8899-02B83694085F'
        Path = "C:\MIM\Synchronization Service\Synchronization Service.msi"
        Arguments = "/qn $($InstallArguments -join ' ')"
        PsDscRunAsCredential = $DomainCredentials
        Ensure = 'Present'
        DependsOn = '[Package]InstallSSMS','[Script]ExtractMimIso','[xADGroup]MimSyncWmiPasswordManagement','[xADGroup]MimSyncConnectorBrowse','[xADGroup]MimSyncJoiners','[xADGroup]MimSyncOperators','[xADGroup]MimSyncAdmins','[xADUser]MimSyncService'
    }

#END Install MIM Sync Service
With this block of code and all the correct users and groups being created by other DSC resources I’ve now got a config which will happily install MIM Sync and use a remote SQL Server.
Next I’m looking at automating the install of MIM Portal and Service, which is considerably more complicated because it involves the use of SharePoint as a pre-requisite.